Installation, setup and operation: everything from a downloaded app to a fully armed stealth suite. For SwiftStealth on macOS 13 or later, Apple Silicon.
SwiftStealth is a macOS-native stealth suite. It routes the apps you choose through your own proxies, assigns each browser window a unique and realistic device fingerprint, and blocks the leaks that normally give you away: DNS, WebRTC and IPv6. Everything runs locally on your Mac, and your proxies and settings never leave your machine.
macOS protects networking features behind explicit user approval. The very first time you run SwiftStealth you will grant two permissions, once each and never again: the Network Extension that performs the routing and leak-blocking, and the DNS filter that seals DNS lookups so they cannot leak to your internet provider. Both are covered step by step below.
This takes you from a downloaded app to a fully armed stealth suite. Follow it in order the first time; afterwards, SwiftStealth starts up on its own.
Open the SwiftStealth disk image (.dmg) you downloaded, drag the SwiftStealth icon into your Applications folder, then launch it. If macOS warns that it was downloaded from the internet, click Open.
On first launch you'll see the activation screen. Paste your license key and activate, and the app binds the license to this Mac. If you later move to a new machine, release it from Settings using Deactivate This Mac.
After activation, SwiftStealth shows a "Starting Up" screen while it launches the protection engine. On a first launch, this is where macOS asks for the two approvals below. The ring around the app icon turns green and reads "Protection Ready" once everything is active.
If the screen shows an orange "Authorization Required" state, the Network Extension is waiting for you. Use the Open System Settings button, then:
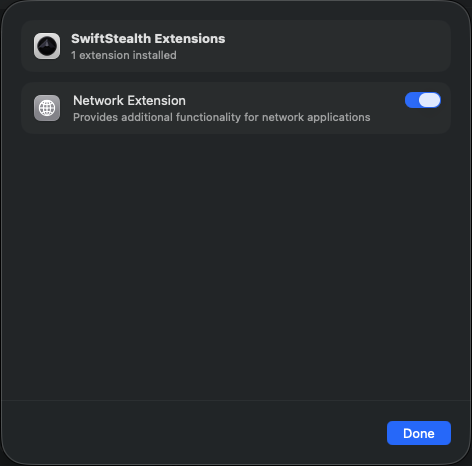
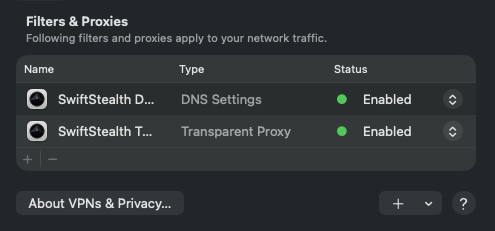
The DNS filter stops your DNS lookups from leaking to your internet provider. SwiftStealth creates it automatically the first time you activate a proxy group, but macOS installs it switched off, so you enable it once by hand:
Once enabled, DNS Leak Protection reads "Active" in the status pill whenever a group is running. You won't need to touch this again.
If you plan to browse with built-in personas (and most people do), install the bundled browser. The first time the main window opens, SwiftStealth detects the browser is missing and offers to download and install it, so just click through. You can also install or update it any time from Settings → SwiftStealth Browser → Install Browser.
A proxy group bundles a pool of proxies, the apps that should use them, a rotation schedule, a fingerprint persona and a kill-switch. You can run several groups at once.
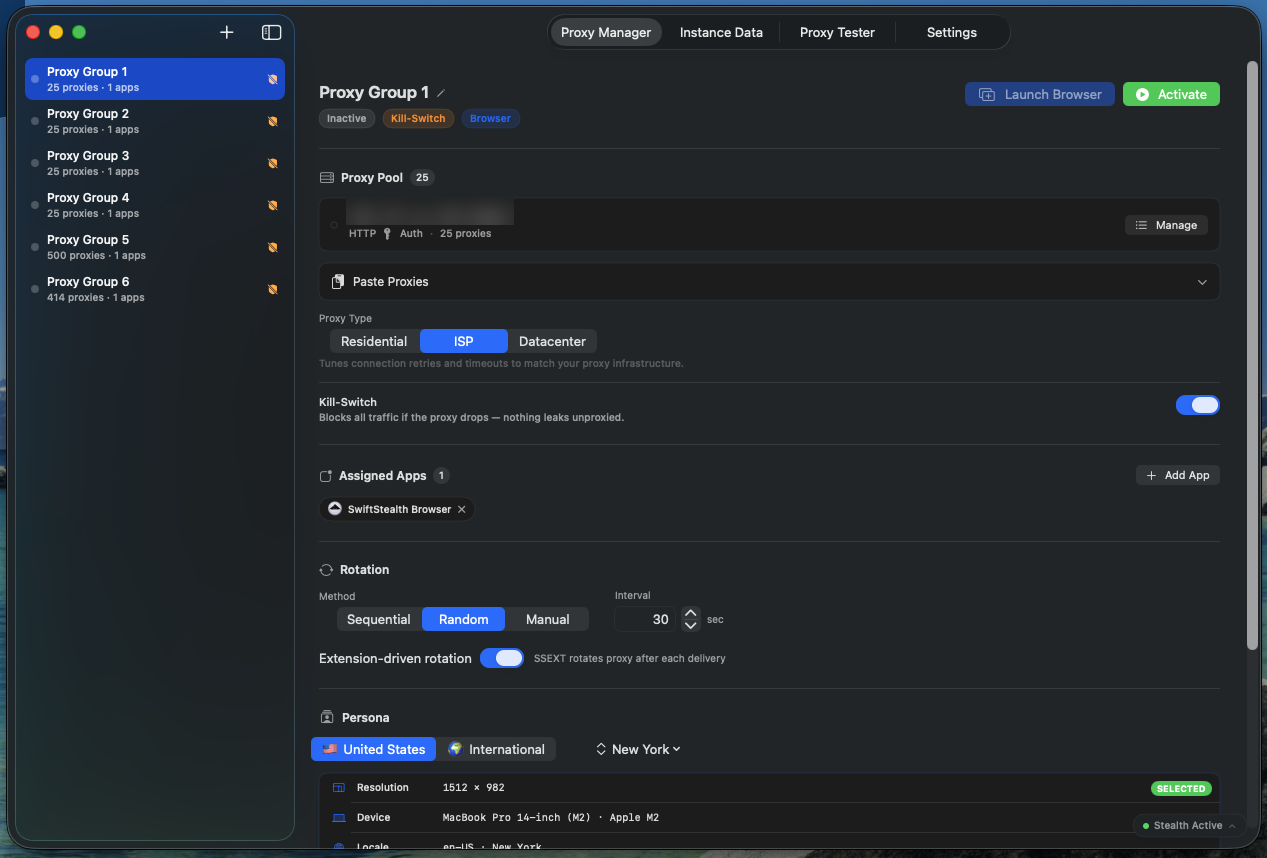
Open the Proxy Manager tab, click Add Group (the "+" button) or press ⌘N, then type a name that means something to you, such as "US Residential", and press Return.
Open Paste Proxies under the Proxy Pool section, paste your proxies one per line, then click Parse & Add. Lines starting with # are treated as comments. SOCKS5 proxies must include the socks5:// scheme; all shorthand formats are treated as HTTP.
Under Proxy Type, choose Residential, ISP or Datacenter. This tunes connection retries and timeouts: residential gets more retries and a longer timeout, while ISP and datacenter connect immediately.
In Assigned Apps, click Add App to open the picker. Search or scroll, click Add next to each app, or use Enter Bundle ID Manually for anything unlisted.
com.swiftstealth.browser) and unlocks the Launch Browser button and persona controls. Chrome and Firefox are detected automatically; for Firefox, the internal plugin-container helper is routed too, so WebRTC can't leak your real IP.A persona is the device fingerprint a browser window presents to websites: user-agent, resolution, locale, timezone and more, drawn from a real Apple device cluster. Pick a region and city, then use Choose Persona to lock one in. Every window runs a fully isolated profile; if you don't choose a persona, each window gets a fresh random one.
The Anti-Detect Mode switch changes how your canvas and audio fingerprints are presented, per group. Leave it off for general stealth browsing, because blending in with real Chrome is harder to detect. Turn it on when profiles must be clearly distinguishable, such as long-lived accounts that must never share a fingerprint.
Under Rotation, choose Sequential, Random or Manual. For timed modes, set the interval in seconds (minimum 10; under 30 shows a "Very fast" warning). Extension-driven rotation rotates automatically after each task delivery.
Turn on Kill-Switch so that if the active proxy ever drops, all traffic for the group is blocked until it reconnects, so nothing leaks unproxied. When engaged, the group shows an orange shield in the sidebar.
Click Activate (the green play button). If you added the SwiftStealth Browser, click Launch Browser to open a stealth window using the group's proxy and persona. Click again for more windows, each with its own proxy and fingerprint. Click Deactivate to stop the group.
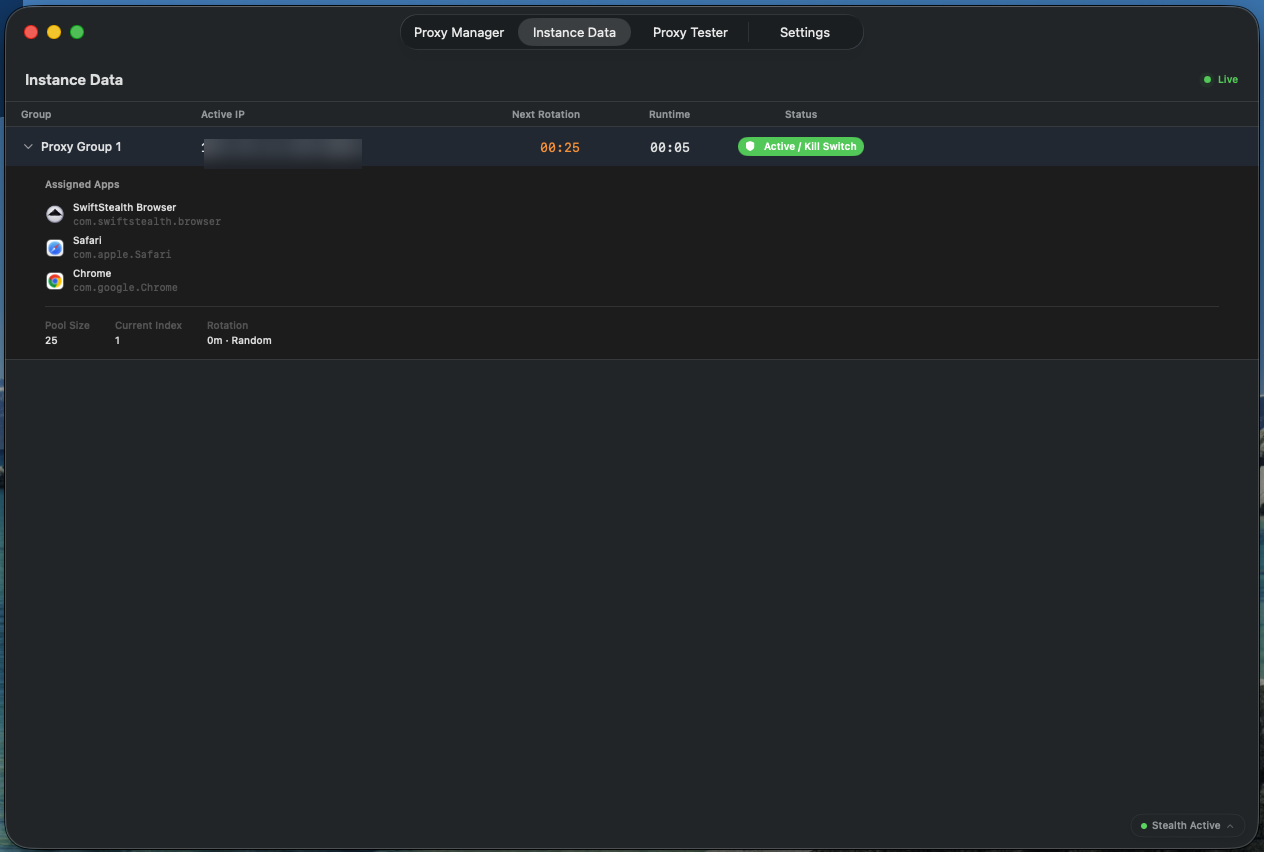
The Instance Data tab shows what's happening right now across every active group: the proxy in use, upload and download throughput, a countdown to the next rotation, the number of proxies in the pool and which one is active, plus the kill-switch state. It updates roughly once a second, so you can confirm a group is live, watch rotations happen, and spot a stalled proxy at a glance.
Before you trust a batch of proxies, test them here. The Proxy Tester checks each proxy's speed, the country and IP it exits from, whether it can reach the destinations you care about, and optionally how risky its exit IP looks to fraud-detection services. Everything runs in parallel.
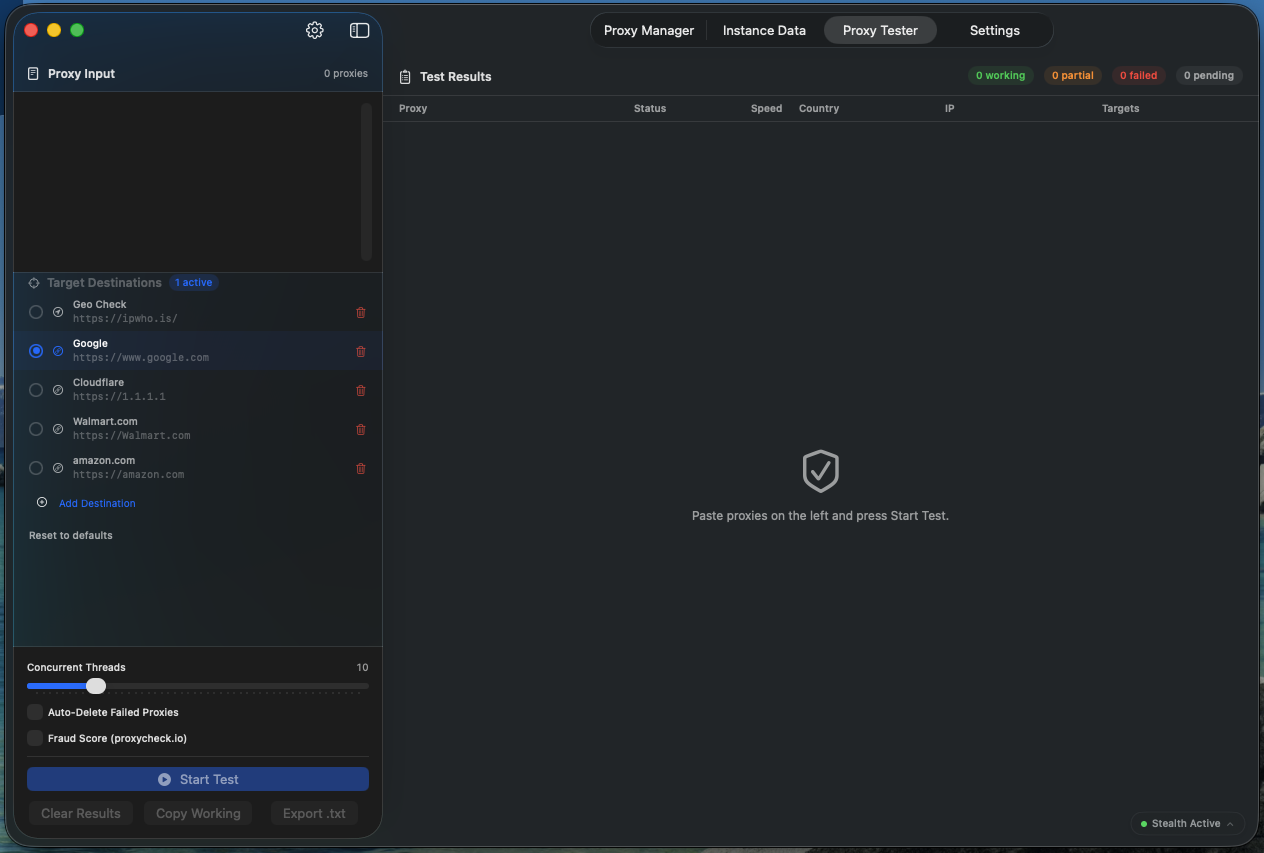
Paste your proxies into the Proxy Input box (same formats as the Proxy Manager). Optionally choose target destinations (Geo Check, Google, Cloudflare, or your own domain, IP or URL), adjust the Concurrent Threads slider (1 to 50, default 10), and switch on Auto-Delete Failed Proxies. Click Start Test; results stream in live. Use Copy Working or Export .txt when done.
Columns cover Proxy, Status, Speed, Country, IP and Targets (plus Risk when fraud scoring is on). Speed is colour-coded: green below 300 ms, yellow 300 to 799 ms, red at 800 ms and above. Summary pills tally working, partial, failed and pending.
Fraud scoring rates how suspicious each proxy's exit IP looks to fraud-detection services. Switch on Fraud Score (proxycheck.io) before starting; a Risk column appears and each proxy is placed in one of four brackets. Each lookup is sent through the proxy it's scoring, so your own IP is never used. Switch on Copy / Export: Low risk only to restrict both actions to proxies that scored Low.
The Settings tab is organized into five sections.
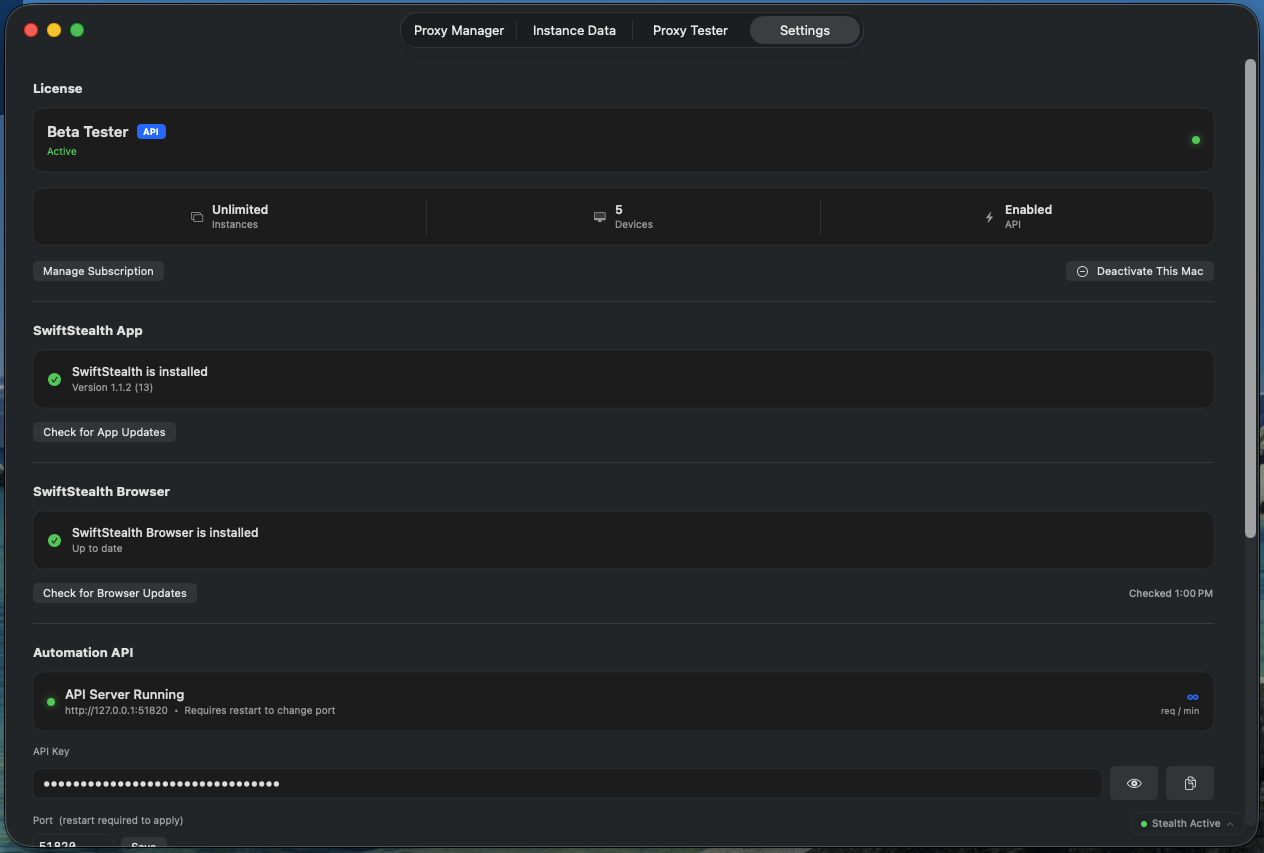
Your activated devices are managed inside the app, under Settings → License → Device Manager. They are no longer managed from your Whop account page. The Device Manager shows every device currently using a seat on your license, how many of your plan's seats are in use, and which one is the Mac you are on (marked "This Mac").
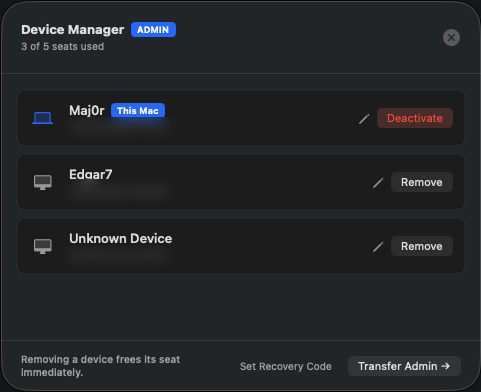
From here you can Deactivate the current Mac, Remove another device to free its seat immediately, rename a device with the pencil icon, set a Recovery Code, or Transfer Admin to another device. Removing a device frees its seat right away, so you can activate a different Mac in its place.
On API plans, SwiftStealth runs a local HTTP and WebSocket API so you can launch browser instances, rotate proxies, generate personas and stream live stats from your own scripts. The server is bound to localhost only and is never reachable from outside your Mac.
The base URL is http://127.0.0.1:51820. Every endpoint except the health check needs your key as a Bearer token:
Authorization: Bearer <your_api_key>Rate limits depend on your plan (for example, 60 requests per minute on API Starter). Reveal and copy your key from Settings → Automation API.
import requests

BASE = "http://127.0.0.1:51820"
AUTH = {"Authorization": "Bearer your_api_key_here"}

# Check the server is up
print(requests.get(f"{BASE}/v1/health").json())

# Launch an instance
inst = requests.post(f"{BASE}/v1/instances", headers=AUTH, json={
    "proxyUrl": "socks5://user:pass@1.2.3.4:1080",
    "country":  "US",
}).json()
print("Launched:", inst["instanceId"])

# Read live stats
for g in requests.get(f"{BASE}/v1/stats", headers=AUTH).json():
    print(g["groupName"], g["bytesDownloaded"])

# Terminate it
requests.delete(f"{BASE}/v1/instances/{inst['instanceId']}", headers=AUTH)Connect to ws://127.0.0.1:51820/v1/events with your Bearer token to receive connected, stats, instance.launched and instance.terminated events as JSON. Stats arrive roughly once a second. It's a one-way push stream, so the server doesn't read what you send.
wscat -H 'Authorization: Bearer <key>' \
      -c ws://127.0.0.1:51820/v1/events
The same command, with your live key already filled in, can be copied from Settings → Automation API.
If something isn't working, the status pill is your first stop. Click it for the full System Status panel, which points straight to whichever component needs attention, whether that's the XPC service, the Network Engine, DNS Leak Protection or the kill-switch.